Heidi


The final version of the robot is the same as the earlier design of squarish-looking robot. But the colors are much brighter now. The robot has the following characteristics:

1. Range-finder detects if someone has come within 30 cm of the robot and if so, the robot abruptly wakes up, moving its head up and eyes lighting up. The robot's neck pulls up using a servo motor and its eyes have LED's which light up to show it's awake and ready to play.


2. Force Sensitive Resistors in the ears detect the slightest rub and if someone scratches one of its ears, the robot giggles (bobs its head and blinks eyes).


3. Capacitive Sensor in the nose detects if anyone touches the nose. If so, the robot pulls its head back down.


4. Wheels activate if a person messes with the robot's nose too much. The robot moves it's head down and then suddenly rolls away to a side (moves to left or right alternately).


The final breadboard looked somewhat like this: (there are still a few connections missing - which I can't take a picture of since the breadboard is inserted into the robot-body to connect to those).


==========================================

Arduino Code:

#include [servo.h]

#define EYES_OPEN  255
#define EYES_SHUT  0
#define EYES_DIM   30

#define HEAD_HI    10
#define HEAD_LO    100

#define RANGE_NEAR 35
#define RANGE_NEARER 20
#define RANGE_FAR  100
#define R_SAMPLES  20
#define INTERVAL   10000
#define WHEEL_INTERVAL   1000

#define TOUCH_HI   60
#define FSR_HI     30

int HEAD = HEAD_LO;
int EYES = EYES_SHUT;

unsigned long currMillis;
long prevMillis = 0;
long prevWheelMillis = 0;
boolean dir = true;
boolean running = false;

// ##################
// ## Analog Pins: ##
// ##################

// RANGEFINDER VARs
int rangeSum=0;         //Create sum variable
int rangeCount = 0;
int rangePrev = RANGE_NEAR;
int rangeCurr = RANGE_FAR;

// FSR VARs
int FSRval1;
int FSRval2;

// ###################
// ## Digital Pins: ##
// ###################

// CAPACITATIVE SENSOR VARs
unsigned int touchX, touchY;
float touchSum, touchOut, touchVal = .07;    // these are variables for a simple low-pass (smoothing) filter - touchVal of 1 = no filter - .001 = max filter

// SERVO VARs
Servo myservo;  // create servo object to control a servo

int pinTest = 3;
int pinFSR1 = 0;
int pinFSR2 = 1;
int pinRange = 2;    // select the input pin for the ultrasonic sensor

const int pinTouchOut  = 2;
const int pinTouchIn   = 3;
const int pinTouchGrd  = 4;
const int pinServo     = 5;
const int pinEyes      = 6;

const int motor1Pin = 9;    // H-bridge leg 1 (pin 2, 1A)
const int motor2Pin = 8;    // H-bridge leg 2 (pin 7, 2A)
const int motor3Pin = 11;    // H-bridge leg 1 (pin 2, 1A)
const int motor4Pin = 12;    // H-bridge leg 2 (pin 7, 2A)
const int enablePin = 10;    // H-bridge enable

int runRangeFinder();
int runTouchSensor();
int runFSR();

int noseCount = 0;

void setup()
{
  Serial.begin(9600);

  pinMode(pinTest, OUTPUT);        // TEST LED
  pinMode(pinRange, INPUT);        // RANGEFINDER
  pinMode(pinFSR1, INPUT);          // FSR
  pinMode(pinFSR2, INPUT);          // FSR
 
  pinMode(pinEyes, OUTPUT);        // EYES' LEDs
  pinMode(pinTouchOut, OUTPUT);    // output pin
  pinMode(pinTouchIn,   INPUT);    // input pin
  pinMode(pinTouchGrd, OUTPUT);    // guard pin
  digitalWrite(pinTouchGrd, LOW);  // could also be HIGH - don't use this pin for changing output though
  myservo.attach(pinServo);        // SERVO:

  // set all the other pins you're using as outputs:
  pinMode(motor1Pin, OUTPUT);
  pinMode(motor2Pin, OUTPUT);
  pinMode(motor3Pin, OUTPUT);
  pinMode(motor4Pin, OUTPUT);
  pinMode(enablePin, OUTPUT);
}

void loop()
{
  currMillis = millis();
 
  randomSeed(analogRead(pinTouchGrd));  // setting the seed to data from unconnected pin
  runRangeFinder();
  runTouchSensor(); 
  runFSR();
  runWheels();

  // when normal --> return to Normal Position
  myservo.write(HEAD);                 
  analogWrite (pinEyes, EYES);
/*
  Serial.print("\t Touch: ");
  Serial.print( (long)touchOut, DEC); // Smoothed Low to High
  Serial.print("\t FSR: ");
  Serial.print( FSRval);
  Serial.println();
*/
  delay(10); 
}


//==================
//  RANGE FINDER
//==================
int runRangeFinder()
{
  unsigned long currRangeMillis = millis();
  // sampleCount starts life at 0, then loops through sampleSize
  rangeSum += analogRead(pinRange);
  rangeCount++;
  if (rangeCount == R_SAMPLES)
  {
    rangeCurr= rangeSum/R_SAMPLES;
  
    Serial.print("Range: ");
    Serial.print(rangeCurr);
    Serial.println();
    rangeCount = 0;  rangeSum = 0;
    if (rangeCurr <= RANGE_NEAR)
      rangePrev = RANGE_NEAR;
    if (currRangeMillis - prevMillis > INTERVAL )
    {
      prevMillis = currRangeMillis;
      if (rangeCurr >= RANGE_FAR)
        rangePrev = rangeCurr;
      Serial.print(" Interval - Curr: ");
      Serial.print(rangeCurr);
      Serial.print(" Prev: ");
      Serial.print(rangePrev);
      Serial.println();
    }
  }
 
  if (rangeCurr < RANGE_NEAR)
  {
    Serial.println("Hi there!");
//    talk();
    HEAD = ( HEAD > HEAD_HI ? HEAD-=10 : HEAD_HI);
    EYES = ( EYES < EYES_OPEN ? EYES+=10 : EYES_OPEN);
  }
  else if(rangePrev >= RANGE_FAR && rangeCurr >= RANGE_FAR)
  {
    HEAD = HEAD_LO;
    EYES = EYES_SHUT;
  }
 
  return 0;
}

//==================
//  TOUCH SENSOR:
//==================
int runTouchSensor()
{ 
  touchX = 0;        // clear out variables
  touchY = 0;

  for (int i=0; i < 4 ; i++ )
  { // do it four times to build up an average - not really neccessary but takes out some jitter

    digitalWrite(pinTouchOut, HIGH);     // LOW-to-HIGH transition
    while (digitalRead(pinTouchIn) != 1) touchX++;// while the sense pin is not high
    delay(1);
    digitalWrite(pinTouchOut, LOW);      //  HIGH-to-LOW transition
    while(digitalRead(pinTouchIn) != 0 ) touchY++; 
    delay(1);
  }

  touchOut =  (touchVal * (float)touchX) + ((1-touchVal) * touchSum);  // Easy smoothing filter "touchVal" determines amount of new data in touchOut
  touchSum = touchOut;

//  Serial.print(touchOut);
//  Serial.println(touchOut);
 
  // when nose touched --> hide
  if (touchOut >= TOUCH_HI)
  {
    Serial.println ("You touched my Nose! :(");
//    EYES = EYES_DIM;
//    HEAD = HEAD_LO;   

    myservo.write(HEAD_LO);                 
    analogWrite (pinEyes, EYES_DIM);
    noseCount += 1;
    Serial.print(" NoseCount: ");
    Serial.println(noseCount);
    delay (1000);
    }
  return 0;
}

//==================
//  FORCE SENSOR:
//==================
int runFSR()
{
  FSRval1 =  analogRead(pinFSR1);
  FSRval2 =  analogRead(pinFSR2);
 
  //  when ear rubbed --> laugh
  if (FSRval1 >= FSR_HI || FSRval2 >= FSR_HI)
  {
    Serial.println("Hehehe :D");
    for (int i = 0; i < random(2,5); i++)
    {
      myservo.write(HEAD_HI);                 
      analogWrite (pinEyes, EYES_OPEN);
      delay(100);

      myservo.write(HEAD_LO);                 
      analogWrite (pinEyes, EYES_DIM);
      delay(130); 
    }
  } 
//  Serial.print(", FSR1: ");
//  Serial.print( FSRval1);
//  Serial.print(", FSR2: ");
//  Serial.println( FSRval2);
 
//  delay (500);
  return 0;
}

int runWheels()
{
    if (noseCount == 3 || running)
    {       
      if (currMillis - prevWheelMillis > WHEEL_INTERVAL )
      {
        prevWheelMillis = millis();
        if (!running)
        {
          digitalWrite(enablePin, HIGH);
          Serial.println("go!");
          running = !running;
        }
        else
        {
          Serial.println("stop!");
          digitalWrite(enablePin, LOW);
          noseCount = 0;
          running = !running;
          return 1;
         }
       
        if (dir)
        {
          Serial.println("dir1!");
          digitalWrite(motor1Pin, LOW);   // set leg 1 of the H-bridge low
          digitalWrite(motor2Pin, HIGH);  // set leg 2 of the H-bridge high
         
          digitalWrite(motor3Pin, LOW);   // set leg 1 of the H-bridge low
          digitalWrite(motor4Pin, HIGH);  // set leg 2 of the H-bridge high
         
          dir = !dir;
        }
        else
        {
          Serial.println("dir2!");
          digitalWrite(motor1Pin, HIGH);   // set leg 1 of the H-bridge low
          digitalWrite(motor2Pin, LOW);  // set leg 2 of the H-bridge high
         
          digitalWrite(motor3Pin, HIGH);   // set leg 1 of the H-bridge low
          digitalWrite(motor4Pin, LOW);  // set leg 2 of the H-bridge high
         
          dir = !dir;
        }
      }
    }
    return 0;
}
So far:


Wheels also move and eyes light up - still need to solder the wires so it can work when the body is mounted on top. The wheels' movement is dependent on signal from the range-sensor. It's still kinda iffy.

The nose has a home-made capacitive sensor, made with a high resistor to accumulate and respond to current (the real capacitive sensor i got from the Prof. Galanter was too big, bulky to be able to fit it easily inside the robot's head. The robot doesn't like it's nose being touched. hides away when nose is touched.

Head bobs and eyes blink if the ears are rubbed (FSR's inside the ears).

Proj 3: Bug

Projects using 3 sensors & two motors:

The object is a small mechanical flying insect called 'Bug'. The bug follows any motion detected in the dark. It either goes around following the motion quietly or, if a certain pressure sensor hasn't been pressed, bug follows the motion while sounding off an alarm. So it can serve as an intruder detector or, in the motion is not caused by an intruder, the insect simply follows the person moving about, casting light on them, knocking into them and hence, 'bugging' them.. =)

It has three sensors:
  • Light sensor
  • A direction sensing motion detector
  • Pressure sensor

And two motors are:
  • DC motor
  • Servo


Model:
The bug has a set of propellers at the front, which are controlled by the DC motor. And it has a flap at the back which can swing 180 degrees using the servo, to allow the insect to turn while in flight.

The insect becomes active only in the dark. As soon as the insect detects any motion in the dark, it starts flying towards it while sounding off a low alarm. The alarm sound can be turned off by pressing onto a hidden pressure sensor on the bug or else it would keep increasing in intensity with each passing minute.

Mechanism:
The bug remains inactive until the light sensor detects there isn't enough light in the room / surroundings. It's green LED lights turn up to indicate that it is 'awake' and detecting motion around it.

As soon as the motion detector detects any motion, the bug starts flight. The DC motor turns on to lift the insect off the ground and the direction sensing motion detector can relay which direction the tail-flap should turn. At the same time the alarm sounds off as well.

When someone pushes onto the pressure sensor, the alarm sounds off but, the bug continues flying and following the motion direction. If the motion sensors stop receiving input for over 30 seconds, the bug circles around it's surroundings for another 30 seconds. If no further motion is detected and the alarm is off, the bug slowly settles down and returns to its initial 'awake' position, waiting for another input from the motion sensors.


Concept Design:
The initial concept design I had in mind for this project was something I had made with just .. junk .. from around my apartment some time ago. Here's what that rather not-so-good-looking bug looked like:


So, the idea for this project is mainly a flying bug - that looks somewhat like the dragonfly above. Possibly, even made to be not-so-pretty-looking 'on purpose' (to make it look like it was actually made out of junk found lying around). Just add a  propeller on the front, and a servo with a flap at the back  :) 

Simulation:
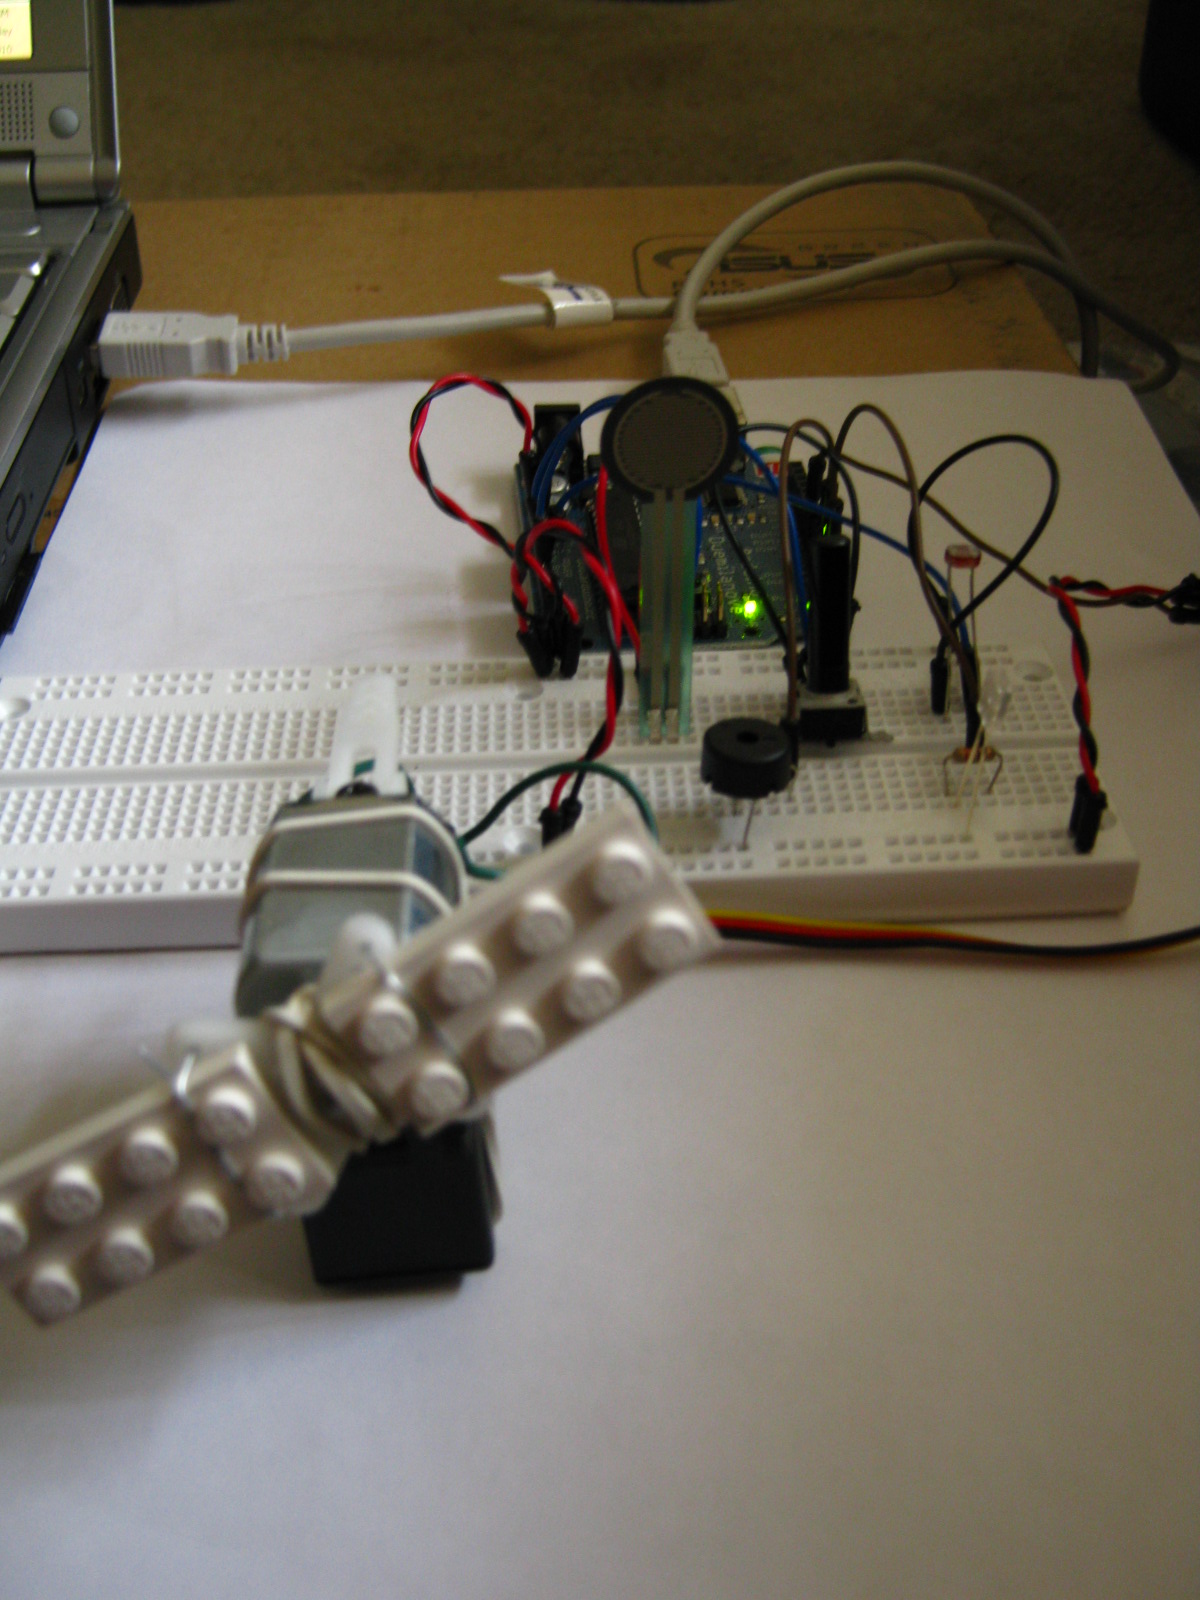
Here's a test simulation I worked on. The servo and the DC motor are connected together. The DC-motor has a couple of lego blocks attached to it as wings. The rest of the things, sensors, LED and buzzer are attached on the breadboard. Also, since we didn't have any direction sensing motion detectors, I have used a potentiometer to tell the servo which direction to move, assuming the moment the servo is first activated, is when motion is first detected. Moreover, the DC-motor already fried my earlier Arduino board because I forgot to attach it through a transistor - so, for now I have just left it off of the Arduino and connected it to an external power without any connection to the Arduino at all, ..just to be on the safe side! :\


p.s. the lego fan *did* really fly away at the end  of that clip!  :\

Proj 2: Accelerometer + Potentiometer driven Animation

2D motion of an animated dragonfly is controlled on screen by using input from an accelerometer.


The potentiometer knob can be used to turn up the opacity of a small radius around the dragonfly to display a hidden image underneath. Only the small area of the hidden image surrounding the dragonfly is visible at a time. You can move the dragonfly around with the accelerometer to explore different areas of the image.

p.s. (the potentiometer is actually meant to be a pressure sensor but, the potentiometer worked better for testing purposes)


** My Arduino Code **

/*
  Reading Accelerometer & Pressure Sensor
  Language: Arduino/Wiring
 
  Reads 3 inputs attached to analog input pins 0 - 3 of the Arduino.
  The first two can be the accelerometer X & Y, and the third a
  potentiometer, or a pressure sensor.
 
*/

int accl_x = 0;
int accl_y = 1;
int sensor = 2;

void setup()
{ 
  Serial.begin(9600);      // initialize the serial port:
}

void loop()
{
  int sensorReading;
 
  // read accelerometer X value
  sensorReading = analogRead(accl_x);   
  sensorReading *=    10;
  Serial.print(sensorReading, DEC);    // print its value out as an ASCII numeric string
 
  // print a comma after the last sensor
  Serial.print(",");
 
  // read accelerometer Y value
  sensorReading = analogRead(accl_y);   
  sensorReading *=    10;
  Serial.print(sensorReading, DEC);    // print its value out as an ASCII numeric string
 
  // print a comma after the last sensor
  Serial.print(",");
 
  // read sensor
  sensorReading = analogRead(sensor);   
  Serial.print(sensorReading, DEC);    // print its value out as an ASCII numeric string

 
  // after all the sensors have been read,
  // print a newline and carriage return
  Serial.println();
  delay (100);
}

** My Processing Code **
/*
  Accelerometer  
  Language: Processing

  This sketch takes ASCII values from the serial port
  at 9600 bps and maps them to screen coordinates.
  The values should be comma-delimited, with a newline
  at the end of every set of values.
  The expected range of the values is between 0 and 1023.

  Created 08 March 2010
*/

import processing.serial.*;
Serial myPort;                    // The serial port

PImage bg_img, mask_img;

Animation animation;
float xpos, ypos, oldx, oldy;
float sensor;
float drag = 30.0;

int maxNumberOfSensors = 3;

void setup ()
{
  // set up the window, background, framerate, and #of frames
  size(500, 500);      
  background(0, 0, 20);
  bg_img = loadImage("background.png");   // Loading background image
  mask_img = loadImage("mask.png");   // Loading background image
  animation = new Animation("dragonfly_", 16);
  frameRate(24);
 
  // List all the available serial ports:
  println(Serial.list());
  // Opening port 8 (my COM port talking to the arduino)
  String portName = Serial.list()[1];
  myPort = new Serial(this, portName, 9600);
  myPort.clear();
  // don't generate a serialEvent() until you get a newline (\n) byte:
  myPort.bufferUntil('\n');
  
  xpos = oldx = width/2;
  ypos = oldy = height/2;
}

void draw ()
{
  // Display the sprite at the position xpos, ypos
    tint (sensor, 255);    // setting the opacity of background
    image(bg_img, 0, 0);
    image(mask_img, xpos-(animation.getWidth()*4)+35, ypos-(animation.getHeight()*4)-70);

    tint (255, 255);      //  opacity of sprite always FULL
    animation.display(xpos-animation.getWidth()/2, ypos);
}

void serialEvent (Serial myPort)
{ 
  // get the ASCII string:
  String inString = myPort.readStringUntil('\n');

  // if it's not empty:
  if (inString != null)
  {
    // trim off any whitespace:
    inString = trim(inString);

    // convert to an array of ints:
    int incomingValues[] = int(split(inString, ","));
   
    if (incomingValues.length <= maxNumberOfSensors && incomingValues.length > 0)
    {
       {
        oldx = xpos;
        oldy = ypos;

        xpos   = incomingValues[0];    // Accelerometer X
        ypos   = incomingValues[1];    // Accelerometer Y
        sensor = incomingValues[2];    // Potentiometer Values
       
        //  Setting coords range between incoming values
        xpos = (xpos > 5500 ? 5500 : xpos < 1500 ? 1500 : xpos);
        ypos = (ypos > 5500 ? 5500 : ypos < 1500 ? 1500 : ypos);

        //  mapping incoming values to edges of screen
        xpos = map(xpos, 1500, 5500, 65, width-65);
        ypos = map(ypos, 1500, 5500, height-94, 0);
        //  mapping incoming sensor values for tint() function
        sensor = map (sensor, 0, 480, 0, 255);
      }
    }
   
    // print out the values
    println(xpos + ", " + ypos + " ," + sensor);
  }
}

// Class for animating a sequence of PNG's
class Animation
{
  PImage[] images;
  int imageCount;
  int frame;
 
  Animation(String imagePrefix, int count)
  {
    imageCount = count;
    images = new PImage[imageCount];

    for (int i = 0; i < imageCount; i++)
    {
      // Use nf() to number format 'i' into 3 digits
      String filename = imagePrefix + nf(i, 3) + ".png";
      images[i] = loadImage(filename);
    }
  }

  void display(float xpos, float ypos)
  {
    frame = (frame+1) % imageCount;
    image(images[frame], xpos, ypos);
  }
 
  int getWidth()  {
    return images[0].width;   }
  int getHeight() {
    return images[0].height;  }
}

Ex: Temperature Sensor

This circuit works like a thermostat. As soon as the temperature goes higher than the 'hi-threshold', the led lights up to let you know it's too hot.

I tried using the alert bit to control the led at first. It didn't work too well, and very unpredictably. I doubt it even was working through the alert bit at all. So, for now it's just a brute force led turning up when the temperature goes higher than the value stored in the T_high register.

Ex: Temperature Sensor from naureenm on Vimeo.


// ARDUINO CODE

#include "wire.h" // (where " "=angled brackets)

int led = 2;

int ptrTemp =  0b00000000;         // TMP102 register pointers
int ptrConf =  0b00000001;
int ptrTLow =  0b00000010;
int ptrTHigh = 0b00000011;
int i2cAddr;                        // used to set address on the chip

void setup()
{
  pinMode(led,OUTPUT);
  Serial.begin(9600);
  Wire.begin();                     // join i2c bus (address optional for master)
  i2cAddr = 0b1001001;              // ADD0 pin connection selects one of four possible addresses
}

void loop()
{ 
//  REQUESTING TEMPERATURES
 /*  TEMPERATURE REGISTER
 */
  Wire.beginTransmission(i2cAddr);  // select temperature register
  Wire.send(ptrTemp);               // (if only temperature is needed this can
  Wire.endTransmission();           // be done once in setup() )

  Wire.requestFrom(i2cAddr, 2);     // request temperature
  byte byte1 = Wire.receive();
  byte byte2 = Wire.receive();   
 
 /*  T_LOW REGISTER
 */
  Wire.beginTransmission(i2cAddr);  // select temperature register
  Wire.send(ptrTLow);
  Wire.send(24);  // (if only temperature is needed this can
  Wire.endTransmission();           // be done once in setup() )

  Wire.requestFrom(i2cAddr, 2);     // request temperature
  byte lowbyte1 = Wire.receive();
  byte lowbyte2 = Wire.receive();   
 
 /*  T_High REGISTER
 */
  Wire.beginTransmission(i2cAddr);  // select temperature register
  Wire.send(ptrTHigh); 
  Wire.send(28);    // (if only temperature is needed this can
  Wire.endTransmission();           // be done once in setup() )

  Wire.requestFrom(i2cAddr, 2);     // request temperature
  byte hibyte1 = Wire.receive();
  byte hibyte2 = Wire.receive();   
 
//  CALCULATING TEMPERATURES
  int tempint = byte1 << 8;         // shift first byte to high byte in an int
  tempint = tempint | byte2;        // or the second byte into the int
  tempint = tempint >> 4;           // right shift the int 4 bits per chip doc
  float tempflt = float( tempint ) * .0625; // calculate actual temperature per chip doc
 
 //  Low_temp 
  int lowtempint = lowbyte1 << 8;         // shift first byte to high byte in an int
  lowtempint = lowtempint | lowbyte2;        // or the second byte into the int
  lowtempint = lowtempint >> 4;           // right shift the int 4 bits per chip doc
  float lowtempflt = float( lowtempint ) * .0625; // calculate actual temperature per chip doc

//  Hi_temp
  int hitempint = hibyte1 << 8;         // shift first byte to high byte in an int
  hitempint = hitempint | hibyte2;        // or the second byte into the int
  hitempint = hitempint >> 4;           // right shift the int 4 bits per chip doc
  float hitempflt = float( hitempint ) * .0625; // calculate actual temperature per chip doc


 // PRINTING TEMPERATURES
  Serial.print( "Temp: C = ");
  Serial.print( int( tempflt ) );
  int tempF = (tempflt * 9/5) + 32;
  Serial.print( " F = ");
  Serial.print( int( tempF ) );

  Serial.print( "   Low:  C = ");
  Serial.print( int( lowtempflt ) );
  int lowF = (lowtempflt * 9/5) + 32;
  Serial.print( " F = ");
  Serial.print( int( lowF ) );
 
  Serial.print( "   Hi:  C = ");
  Serial.print( int( hitempflt ) );
  int hiF = (hitempflt * 9/5) + 32;
  Serial.print( " F = ");
  Serial.println( int( hiF ) );
 
 
 //  LIGHTING UP THE LED IF TOO HOT
  if ( tempflt > hitempflt )
    digitalWrite(led,HIGH);
  else
    digitalWrite(led,LOW);
   
  delay(500);
}

Ex: Rock_Paper_Scissor w/ Arduinos Connected

Arduinos connected through serial connections. Using RGB in place of rock, paper and scissor.

R beats G
G beats B
B beats R

-------- ARDUINO CODE -------------

 int RxPin = 0;
 int TxPin = 1;

 int button1Pin = 2;    // select the input pin for the potentiometer
 int button2Pin = 4;

 int p1color = -1;
 int b1currState = 0;
 int b1prevState = 0;

 int b2count = 0;
 int b2currState = 0;
 int b2prevState = 0;

 int ledPin1 = 11;
 int ledPin2 = 10;
 int ledPin3 = 9;

 int ledWinPin = 5;
 int ledLosPin = 6;

 boolean hold = true;
 int checkbit = 0;
 int p2color = -1;

 void setup() {  
   pinMode(button1Pin, INPUT);
   pinMode(button2Pin, INPUT);
  
   pinMode(ledPin1, OUTPUT);
   pinMode(ledPin2, OUTPUT);
   pinMode(ledPin3, OUTPUT);
  
   pinMode(ledWinPin, OUTPUT);
   pinMode(ledLosPin, OUTPUT);

//   pinMode(RxPin, INPUT);
//   pinMode(TxPin, OUTPUT);
  
   Serial.begin(9600);
 }


void loop()
{
  b1currState  = digitalRead(button1Pin);
  b2currState  = digitalRead(button2Pin);

/*  STEP 1: CHOOSING WHICH COLOR
    0 = nothing - cannot send when LED is in this state
    1 = R
    2 = G
    3 = B   
*/
  // getting input from the RGB LED button
  // to learn which LED is chosen
  // and saaving the chosen color in p1color
 
   if (b1currState != b1prevState)
   {
       if (b1currState == HIGH)
       {
         if (p1color == 2) p1color = 0;
         else  p1color++;
         Serial.print("RGB LED state:  ");
         Serial.println(p1color, DEC);
       }
       b1prevState = b1currState; 
       delay (100);   
   }
  
   if (p1color == 0)
   {
    digitalWrite(ledPin1, LOW);
    digitalWrite(ledPin2, LOW);
    digitalWrite(ledPin3, HIGH);
   } else
   if (p1color == 1)
   {
    digitalWrite(ledPin1, LOW);
    digitalWrite(ledPin2, HIGH);
    digitalWrite(ledPin3, LOW);
   } else
   if (p1color == 2)
   {
    digitalWrite(ledPin1, HIGH);  
    digitalWrite(ledPin2, LOW);
    digitalWrite(ledPin3, LOW);
   }else
   {
    digitalWrite(ledPin1, LOW);  
    digitalWrite(ledPin2, LOW);
    digitalWrite(ledPin3, LOW);
   }
  
/*  STEP 2: SENDING CHOSEN COLOR TO OTHER PLAYER
*/
   if (b2currState != b2prevState)
   {
       if (b2currState == HIGH)
       {
         Serial.print("Sending state = "); Serial.print(p1color, DEC);
         Serial.println(" to other player's Arduino...");
                
//         digitalWrite(TxPin, 3);
//         digitalWrite(TxPin, p1color);
        
         Serial.write(255);
         Serial.write(p1color);
       }
       b2prevState = b2currState;   
       delay(100);   
   }
  
  
/*  STEP 3: HOLDING UNTIL COLOR RECEIVED
            FROM OTHER PLAYER
*/
  if (Serial.available())
  {
//    p2color = digitalRead(RxPin); //Serial.read();
    p2color = Serial.read();
   
    if (!hold)
    {     
      if ( (p1color == 0 && p2color == 1)
         ||(p1color == 1 && p2color == 2)
         ||(p1color == 2 && p2color == 0)  )
      {
        digitalWrite(ledWinPin,HIGH);
        digitalWrite(ledLosPin,LOW);
      }
      else    
      if (p2color == p1color)
      {
        digitalWrite(ledWinPin,HIGH);
        digitalWrite(ledLosPin,HIGH);
      }
      else
      {
        digitalWrite(ledWinPin,LOW);
        digitalWrite(ledLosPin,HIGH);
      }
     
      delay (20000);
     
      // resetting after some time
      hold = true;     
      p2color = -1;
      digitalWrite(ledWinPin,LOW);
      digitalWrite(ledLosPin,LOW);
    }
   
    if (p2color == 255) //255
      hold = false; 
  }
}


Ex: Blinker / Dimmer in Serial Connection


The Arduino Code:


 const int ledPin = 9;      // pin that the LED is attached to
 byte brightness = 0;
 byte blink_rate = 0;
 byte checkbit = 0;

 int state = 0;

 int ledState = LOW;        // to store LED states
 long previousMillis = 0;   // to store last time LED was updated


 void setup()
 {
   // initialize the serial communication:
   Serial.begin(9600);
   // initialize the ledPin as an output:
   pinMode(ledPin, OUTPUT);
 }

 void loop()
 {
   unsigned long currentMillis = millis();

   // check if data has been sent from the computer:
   if (Serial.available())
   {
     // read the most recent byte (from 0 to 255):
    checkbit = Serial.read();
    if (state == 2)
    {
      blink_rate = checkbit;
      state = 3;
    }
    if (state == 1)
    {
      brightness = checkbit;    
      state = 2;
    }
    if (checkbit == 255)
    {
        state = 1;
    }
   } 
  

  if(currentMillis - previousMillis > blink_rate)
  {
    // save the last time you blinked the LED
    previousMillis = currentMillis;  
    // if the LED is off turn it on and vice-versa:
    if (ledState == LOW)
    {
       ledState = HIGH;
       analogWrite(ledPin, brightness);
    }
    else
    {
        ledState = LOW;
        analogWrite(ledPin, 0);
    }
  }
}

........................................................................................
Processing code:


  import processing.serial.*;
  Serial port;
//  byte start;
 
  void setup()
  {
  size(254, 150);
 
  println("Available serial ports:");
  println(Serial.list());
 
  // Uses the second port in this list (number 1). 
  port = new Serial(this, Serial.list()[1], 9600); 
  }
 
  void draw()
  {
  // draw a gradient from black to white
  for (int i = 0; i < 254; i++) {
  stroke(i);
  line(i, 0, i, 150);
  }
 
  // write the current X & Y-position of the mouse to the
  // serial port as a single byte


    port.write(255);
    port.write(mouseX); println("X: " + mouseX);
    port.write(mouseY); println("Y: " + mouseY);
  }